How to cover a lampshade with a simple method and using a glue gun. Cut fabric, fold and glue and before you know it, you’ll have a new lampshade
How to Cover A Lampshade
 So, I’ve done a lampshade covering tutorial before, but thought I’d throw it in here again, with my newest project underway. You’ve seen the yardsale lamps I found for the guestroom redo & I spied some fabric that I really wanted to use on these lamps, so that meant recovering my own. That also meant I sure didn’t want to pay much for lampshades that I was just going to recover. So, back to the junk store that I told you about last year..where I found 2 of these beauties for $1 each…just right for this budget. You can see they were in sad shape, but the price was right. The fabric on there was literally falling apart, so I went ahead and ripped it off.
 And ended up with just the metal frame. Now, I’ve never covered a lamp with just the metal frame before, but I figured I’d wing it. Since my new fabric needed something to stick to, I pulled out some old white lining fabric I had laying around.
 And pieced it together, hot gluing it at the top and bottom of the framing, overlapping it as I went around. I pulled it as tight as I could to get a taut framework for my new fabric.
 I snipped off the extra fabric and turned it just under the top and bottom of the frame, pulling and gluing, pulling and gluing (man, does that hot glue hurt!).
 It looked like this when I was finished. Nothing pretty about it, but it’s not going to stay like this.
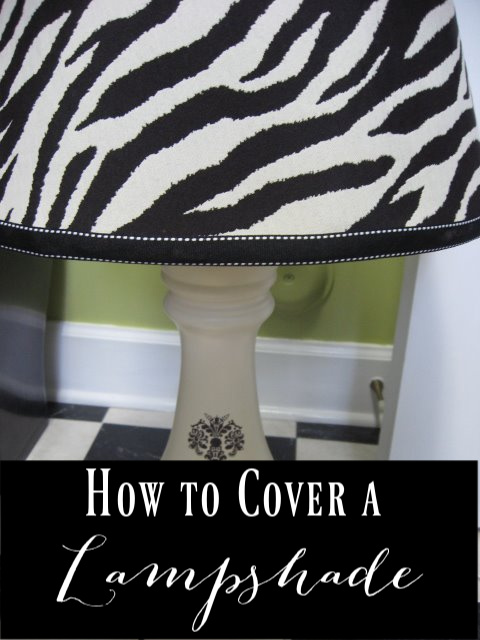
 Found this pretty zebra fabric at Hobby Lobby (30% off this week) and picked up 2 yards. Enough to recover the lampshades AND to cover that pretty little Big Lots bench too. I showed you how to make a pattern for your shade before, but here’s a refresher. This is just old wrapping paper that came out of a shopping bag that is pieced together. Lay your shade on it and pencil around the top & bottom (leaving about 1″ above and below) as you roll the shade across it, meeting at the back. This gives you a pattern to follow when you’re cutting out the fabric. I cut out 2 pieces for my shades. I wing things a lot and didn’t even pin this down, just held with one hand and cut with the other. I take shortcuts like that. Did I tell you I’m not a perfectionist. Well, I’m not.
  I missed a couple of pics, but next step is to spray the outside of the shade (on top of my white fabric) with spray adhesive. This stuff works great on a project like this. It keeps that fabric smooth and will help it lay down correctly. So above, I’ve already sprayed with adhesive spray and have started to smooth out the fabric. This part takes a little time, but you can pull the fabric back up and keep working with it until you smooth out the wrinkles. Work your way around until both pieces meet on the back of the shade.
 Then you’ll want to turn under one side and glue it down. I also take the iron and run over that seam to help it stay down. I used my glue gun to then pull and turn under the top and bottom edges just like the white fabric that I put on first. Pull and glue until you get it all tucked under the inside of the shade. You’ll have to trim it again with scissors. Doesn’t matter how neat the inside is anyway, that won’t be seen. I used a little fabric glue on the main seam but the glue gun would be fine too. I then added some simple ribbon from Hobby Lobby around the top and bottom of the shades with fabric glue and here it is….
 Two finished lamps for the guestroom redo. Total cost: $38 for both lamps. I’d say that’s pretty cost effective, wouldn’t you?
 And they are custom lamps, one of a kind…even better! So don’t throw out those old lampshades. Look at them in a whole new light…get it?!


Way to go! I need to do that in my living room that I’m working on right now. Your inner liner was a smart idea!
Rhoda, you are the queen! I love having this tutorial, and boy, did you do a good job, or what?! Now, will you please come back to Florida and help me with a pair of adorable little pink lamps I found for $4 each at a yardsale? Did I mention that, in addition to needing wonderful new shades, they need to be rewired??? 😉
Great job! Can’t wait to see them in the new room!
XO,
Sheila
The lamps look beautiful! You never fail to inspire me. Thanks for sharing your ideas.
Fran
Rhoda,
Those are so unbelievably cute. Great job!!
THAT is amazing! When I think of the old lamp shades I have thrown away, I think what a waste! I am saving your tutorial for future reference. Thanks so much.
Great new look for the lamps…can’t wait to see this room finished!
Hi Rhoda,
You make it look so easy! Your project turned out great…I’m sure the lamps will look fabulous in the new bedroom!
Great project – I love the zebra fabric.
Thanks for showing us how the magic happened.
Super job Rhoda, the lamps are beautiful! Can’t wait to see your next project!
Carol :0)
Great job Rhoda. Bless your heart "pulling and gluing, pulling and gluing (man, does that hot glue hurt!)." Oh man does it. My friend told me to always keep a bowl of cold water with ice cubes in it next to me to "dunk" my hand/fingers for these ooppps times. I've certainly had my share.
I'm working on my master bedroom redo too. It's taking a lot longer than I wanted since I hurt my back and ended up in the hospital. . . my hubby has been helping me (but that's driving me ~ this AAA personality, control type nuts.) He painted our bedroom (Khaki color) for me last weekend because I can't right now (of course, I do a better job ~ssshhhh~) He didn't paint the outlet covers, doesn't paint the wall up by the white ceiling as "perfect" as I do. . . but I won't say a word to him. He wasn't really happy about doing it for me in the first place ~ but since the room was torn apart he really had no choice since I couldn't 🙁
Anyways, I finished my sleigh bed, before getting hurt. It's in the room now and I'm loving it. I'll post pictures soon as I make additional progress. Driving me crazy. . . I want to hang up my new pictures and accessories and get started on drapes and here I lay ~ going to physical therapy now 3 x a week AAUUGGGHHH!!!
Blessings & Hugs,
Sher
Love it Love it Love it! I have just purchased a couple of very inexpensive lamps that I’m going to spray paint and now I know that I can recover the shades to make them amazing. Thanks!!!
Morning girl….I love these ‘workshops’ you do for us!!!! You give us such inspiration to try things we never would have the courage to try! I love it! I have old lamp shades in the shed! lol Thanks for all the info girl…keep it up…have a great week!
Something I’ve never done – and I will keep this in mind. How cool is that! Thanks for the great tutorial!
Very chic!!! I love those lamps.
That turned out really cute! I still have the tutorial I printed out from you the last time and one of these days I’m going to do it! You make it look so easy!
Manuela
…in a new light-LOL. I really like the fabric- what an animal you are, Rhoda! RRRR! This is where you weed out the people with A.D.D. I will have to try this one day. Or, I’ll drop off shades at your house.
Looks really good! Love the zebra print. You have definitley been blessed with thte creativity gene!
Have a great week,
Jen
Wow, they look great! Amazing. Not that I wouldn’t expect it from you!
I always wondered how to change fabric on a lampshade, thanks Roda for the tutorial! Lampshades look awesome!
Thanks for the tutorial! I have an old lampshade that really needs this treatment. I’m going to try it!!! Sally