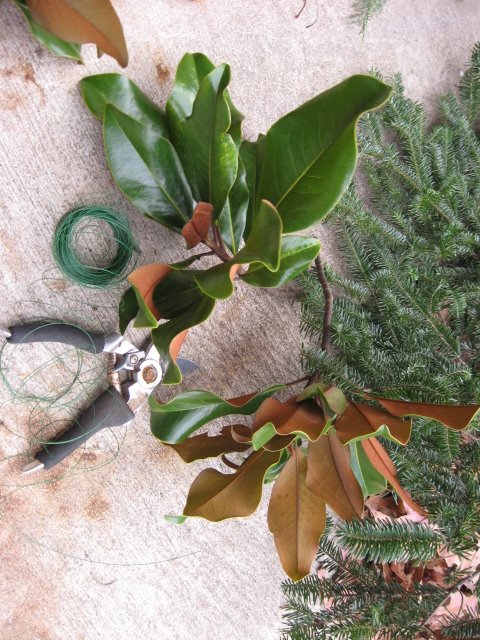
 Real greens are so easy to come by this time of year, so why not add them to your mailbox instead of the storebought variety which everyone does. All you need are some Christmas tree branches that you can easily find at the tree lots for free. Gather those up, along with some magnolia, cedar or cypress to add variety (or really anything in your yard like boxwood, holly and nandina), a couple of pinecones, some shiny gold balls, and leftover ribbon. Doesn’t have to be fancy, just see what you have laying around. Some floral wire helps to hold it all together.
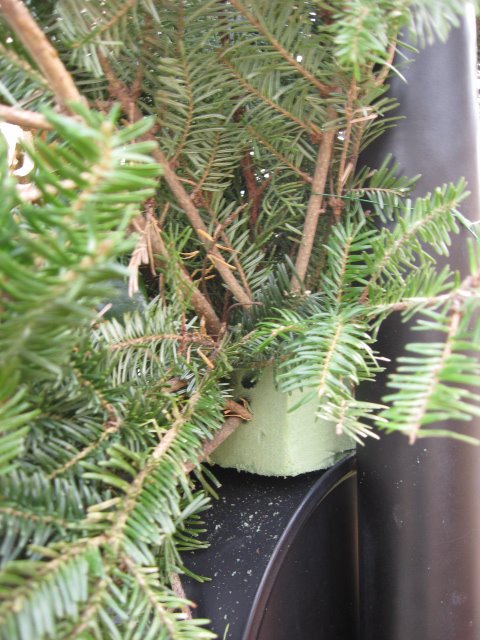 This year, I took a little shortcut and added a block of floral foam right underneath the iron scrolly piece that comes out of the post above my mailbox. Then all you do is start snipping off tree branches and adding them into the foam on both sides. Just keep it even and you’ll be fine. Snip and tuck into the foam, filling it in around the sides and edges and even some coming out the top. After I added a few branches, I took a piece of floral wire and looped it around the branches directly onto the back post of my mailbox to hold it a little tighter in case we have some wind.
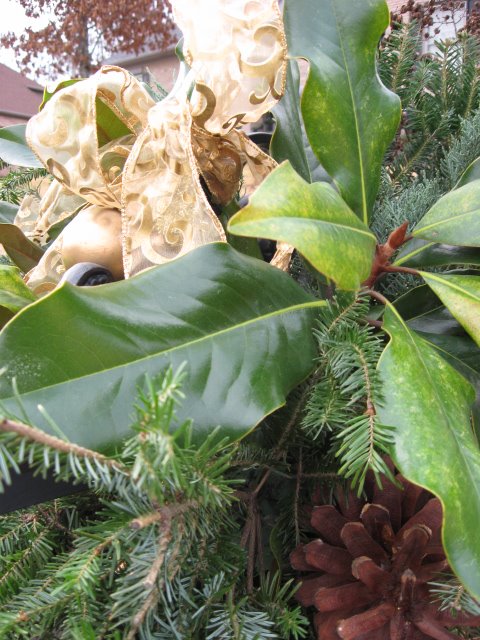 After you fill in the fir tree branches, then just tuck a big chunk of magnolia in there too and it will spill out the top and look SO pretty. I added a little juniper too, which you can barely see in the top right. Wrap a little of that floral wire around the top of the pinecone and wire it onto a branch nice and snug, just twisting the wire to keep it together. That stuff works great on floral projects.
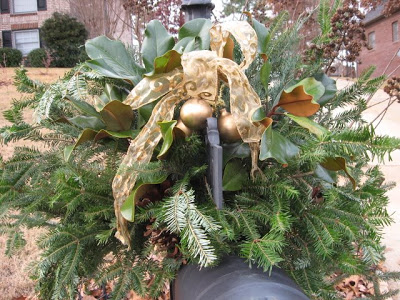 You can really add anything you want on here, the fir branches are great basic greens, then the magnolia leaves really are a traditional Christmas look. To finish it off, I just strung 3 gold balls on a piece of that floral wire and added it to the middle. Tie a bow in the center and call it done! Of course, you can use anything in the middle, red or silver, just use your imagination. I’d love to find a couple of those really BIG ornaments to save for this spot next year. Another thing to look for after Christmas.
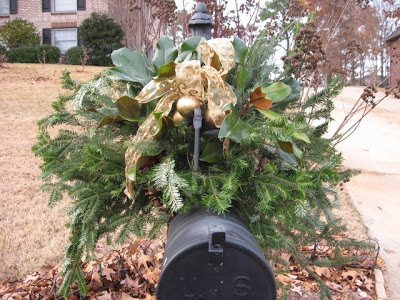 Ten minutes was all this took and now I’ve got a different look than all my neighbors with the fake green swags with red velvet bow. I like to be different, don’t you?!
 Come back on Monday and I’ll show you my livingroom with the tree and mantel. I’m participating in BooMama’s Christmas tour too, along with Hooked on Holiday Houses, so be sure to get over there and check out everyone else’s Christmas decor. It’s sure to be inspiring! And I’m also going to host a Christmas tour on MY blog too on Monday, so come back and add your link to Mr. Linky here. Don’t forget to add a link from your blog back to my post so all of your readers can come over for the tour too. It’s going to be a Christmas extravaganza!


Oh wow – you made that look so pretty, Rhoda – it’s so bushy and beautiful! 🙂
That’s a really cute idea. I’m not a big fan of things like “real” Christmas trees being in the house, but something like this I would totally do!
Too bad around here we don’t have roadside mailboxes! Ours are just the boring connect to the house kind,so I guess I’ll have to stick to a wreath on the door!
Emily
Blah-Zay
Mama and Hustler???
Great MOMS Think Alike
I didn’t get around to picking up scrap trimmings this year. One year, we were able to get quite a lot. Jim’s going to cut some cedar, for me and I’m going to cut some boxwood from the front garden. There is some pretty decent holly in our garden too, but they are males, apparently. No berries.
Your mailbox, looks beautiful!
My daughter got me set up with wireless today. I am a very happy camper. We have it at the lake and I love it. Now, I’m going to set up a little office upstairs someplace. Perhaps the hearth room, after Christmas. I won’t know how to act, when I get out of my little corner, in the basement!
Rhoda. . .Great post on the mail box swags. It’s something a lot of people don’t think of doing. I can’t believe that it took only 10 minutes to create something so pretty and elegant!
Lori
It turned out beautiful! Unfortunately we don’t have our own mailbox anymore. Do you suppose anyone would complain if I decorated the neighborhood box?
Thanks Rhoda. It’s suppose to warm up here in Cincy tomorrow so maybe I’ll get outside and jazz up my mailbox, it’s very sad looking no matter what season it is. I love what you have done.
What a nice surprise for your mailman. I love it! I like to do something like this on my gas lantern in the front of my house. Hope your holidays have been nice so far. Take care~
Thanks–I’m headed to the yard–I hope I can find some of the same items—love the look–you did a great job.
Okay, Monday get in your car and drive south 1.25 hrs (I have it timed exactly) and while I’m at the dentist having a crown done, you can foo-foo up my mailbox. I’ll leave stuff on the porch and you can look around in the yard too! Girl, that mailbox is so gorgeous.
I’m posting dining room pics on Monday too and possibly den and bedroom. Yep, I have a branch tree in my bedroom (like you said, we must be on the same wavelength cause I had the branches in a container, just not decorated yet).
“See” you soon!
Judy
I love this, Rhoda. What a pretty mailbox you now have! Thanks for such great tips and inspiration. I am going to be stealing some magnolia leaves from my neighbors tree now;)
RHoda! That’s so pretty!
You are a clever lady! This looks super expensive and so lovely… thanks for showing us how easy it is to do…I don’t have that freestanding type of mailboz now, but I sure do love yours! 😉 Bo
Beautiful job as usual Rhoda! I need to follow your example and look around outside for a few things to clip, wire together and tie a bow around. My mom always used natural to decorate when we were growing up.
I have something for you, stop by my blog when you get a chance.
Rhoda, just wanted to let you know I’ve got Mr Linky up and running so you can join the party whenever you’re ready. -Julia 🙂
Ack! Sorry, second try! Rhoda, that is beautiful! I’ll be here for the party! I’m having a tree party too!! This is so fun!
What a great idea! And it’s so plush and full. I should have enough greenery on the farm to make something. Thanks for the ideas, and I’ll be checking back for your open house.
I sure do miss magnolia trees!!! This is very nice…love the natural look.
YOUR SWAG TURNED OUT SO PRETTY. I’VE BEEN BUYING CHRISTMAS SWAGS AND WREATHS FROM A LITTLE FRIEND AS A FUNDRAISER THE LAST COUPLE OF YEARS, BUT THIS YEAR THEY’RE DOING SOMETHING DIFFERENT. GUESS I BETTER GET BUSY AND MAKE THE SWAG MYSELF.
hOLLEY
WooHoooo! I’m officially your 200th follower! 🙂
Of course I’ve been following you for a few years, but now it’s official. haha!
All of your decorations are so lovely. Absolutely adorable!
Please come visit on friday as I will host my last giveaway before Christmas.