I haven’t written a lot of posts about photography, simply because I am not an expert. But, I wanted to take the time to devote a post to the importance of great photos in blogging. When I have written tips about blogging, taking pretty pictures is one of the things that I’ve mentioned time and time again. So, today I’m going to break it down and explain how I have learned to take better pictures for my blog.
When I started blogging back in 2007, I had a simple point and shoot. I ended up with a Canon Powershot and used it for a couple of years and it was a great little camera (that I still have packed in a box somewhere). It is a Canon AS570is (I think). Not too expensive at all, less than $150 at the time. It did a great job of taking pics and I learned how to get some pretty good shots with it.
But, as I continued with blogging and saw all the great photography across the web, that alone awakened a thirst to learn more and improve my photography skills as time went on. I started to see the difference between an OK photo and a great one. I had no idea how to use lighting to my advantage. I had taken pics with my flash for as long as I had been taking pics.
But, one of the first things I learned in blogging to get a better looking photo was this one simple thing:
Turn off the flash!
Such a simple concept, but it really did change my photographs for the better. Using the flash on a camera just washes out the true colors and puts light where you really don’t want it. It’s not a great look and natural light is always the best option. If you can shoot a room with natural light, you will have a much better photo in front of you.
Now, keep in mind, I have no idea what I’m really talking about when it comes to photography. There are SO many more bloggers out there who do it way better than I do. I’m simply going to share what I’ve learned myself to take better photos and how photos are such an important part of blogging, especially for those of us who blog about home and food.
So, that point and shoot was just fine for many years, but in 2010, I had saved some money up and decided that it was time to upgrade to a fancy DSLR camera. I started asking questions and doing research and knew that blogworld is split into two camps when it comes to cameras: Canon and Nikon
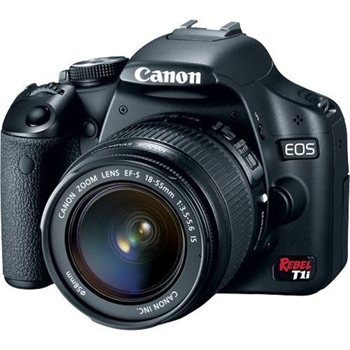
I had used Canon’s before, so naturally gravitated to that brand and I ended up with a Canon T1i in June of 2010. I was so excited to get this new camera and begin playing around with it. All those bells and whistles were total Geek to me and I had no clue what I was doing. I still don’t really, but I’ve managed in a year and a half to learn how to move those buttons and dials and get a decent pic. I still don’t know the technicalities of it all, but at least I can take some pretty nice pics with my camera. I’m still planning to take a hands on class really soon and maybe I’ll finally learn even more about what my camera can do.
To break it down, I’m going to give my best tips for taking better photos. Let me remind you. I don’t really know what I’m talking about, so keep all of that in mind. Please, if you are a professional photographer, take what I say with kindness.
-
Always turn off the flash, unless you have one of those fancy flash things that throw the flash where you want it to go. Most of the time, just turning off the flash will achieve a much prettier pic.
-
Shoot in daylight and get as much natural light in the pic as you possibly can. Most of the time, light coming in during the daylight hours will allow you to manipulate your pics and get some nice ones, with natural light flooding in.
-
Early a.m. and late afternoon are known to be the best times to shoot pics outdoors to avoid harsh shadows.
-
Make your pics as large as you can get them. I still see this many times on newer blogs. When I first started, I had no idea how to make my pics larger and most of us back then had tiny pics on our blogs. Once I figured out how to blow them up and make them large, there was no turning back. Most picture editors will help you with sizing pics and I do all of mine in Photoscape, and did a tutorial on it. My blog will hold a 500 wide picture and I resize them all before I load them. Everyone wants to see big, beautiful pics on blogs, so do your best to make yours large and easy to see. Those details make a difference to anyone coming by. We all love pics!
I have learned a few things about my Canon camera and when I’m out and about taking pics, I have to quickly move the dials up and down, depending on where I am, inside or outside. I shoot in Manual and AV.
In Manual mode, I have to move all the dials together to achieve the right lighting, The 3 things you have to be concerned about in Manual mode are:
Aperature setting/F-stops – Here you play with Depth of Field, the setting that allows you to blur a background & focus on the foreground.
ISO– This setting controls how much light is coming into your camera lens. For outdoors, you can set it at 200, 400 or more and inside settings, I normally use 800 or 1600. I do know that 1600 is pushing it for graininess, but sometimes I have no choice but to bump it up to get more light in.
Shutter Speed – This helps set your camera for movement. Fast or slow shutter speeds. The lower it is set, the more careful you have to be with camera movement.
I have learned how to move all 3 of these to get a decent pic. It’s not technical, but just from playing around with these settings, I can get some pretty nice shots. I’m not going to attempt to explain what all of these do, but they all 3 work together to achieve a pretty picture and if you get one of them off, it will show up fast. I look through my viewer and look at the lighting meter at the bottom of the screen to see how far up or down it is reading and then I move the dials up and down to get it more towards the middle of the meter.
So, as a rule of thumb, when I am inside I will switch back and forth between Manual and AV. With Manual, I have to be more careful about where everything is set and sometimes in a dark space, I can’t get enough light in and I’ll switch to AV, which helps me manipulate the light a little better.
In AV mode, it automatically sets 2 of the 3 above settings and then I can move the light meter dial up higher to lighten up a pic. Most of the time you want to keep that in the middle setting.
I’ll be honest, I still haven’t learned to read a histogram, which shows you when your pic is blown out with too much light or is too dark from the settings. I just play around with the dials until I see what I like on the screen. Technical, right?! That’s how I roll. See, I told you I have no idea what I’m talking about, so keep that in mind.
My pics are far from perfect, but most of the time, I can get some decent pics on the go. All those photos you see me post from my shopping trips, looking and browsing at pretty stores, are always done on the fly. I try to get everything set up just right, but it doesn’t always happen. That is where photo editing comes in handy and I use that to improve my pics even more. If a pic is a little too dark, I will lighten it up in Photoscape, as well as add Contrast, backlighting, and more.
Here are a few settings that usually work for me indoors:
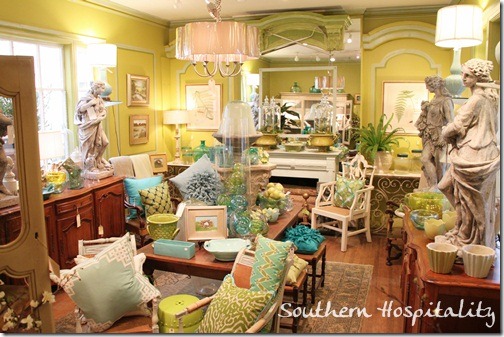
(Manual setting: 1/50, f/3.5, ISO 800)
For instance, this is a pic in a shop here in Atlanta, that I’ll be sharing more of later. This pic is set at 1/50, f/3.5, ISO 800. I have found that I can get a pretty steady pic set at 1/50, but if I go lower than that, the camera gets shaky. So most of my indoor pics, I try to keep at this setting. I usually leave my ISO on 800 if I can, but if I need more light, I will go up to ISO 1600, which makes for a grainier pic. Sometimes you have to trade off grain for light. This pic is pretty much in focus all the way around. The higher your f-stop, the more in focus an entire scene is. I do know that the lower f-stop will get a blurred background when you focus on a close up object and let the background blur. I love that effect in a pic.
Now, in a perfect world, we would all carry our tripods around with us and take great shots with a timer. With a tripod, you can move your shutter speed way down low and it will let in plenty of light and you won’t have camera shake with a longer lens opening. But, for those of us on the go, we can’t take a tripod with us all the time. These are a few settings I have learned that work well for me.
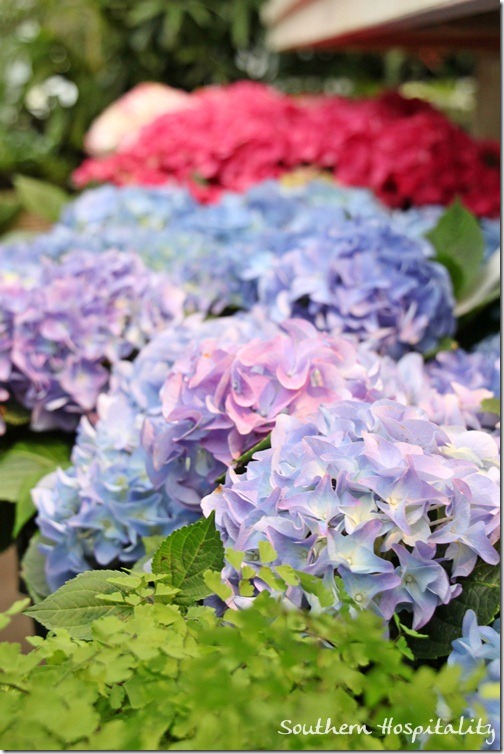
(Manual setting: 1/50s, f/4.0, ISO 800)
Here’s an example of blurring the background, also known as depth of field. I always keep my lens on Autofocus. I think most of my blogger photographer friends do the same thing, but I know many pros keep their lens set on Manual, which means you have to manually focus every single pic. I’m not there yet and probably will never do that. I like to let my lens do the work for me. You can set your red dot to focus anywhere you want it by moving those settings around. But, usually I’ll pick a spot and get my lens to focus on it and most of the time that works well for me. I focused on the front of the purple hydrangeas and it blurred out the background for me. That is exactly what I wanted.
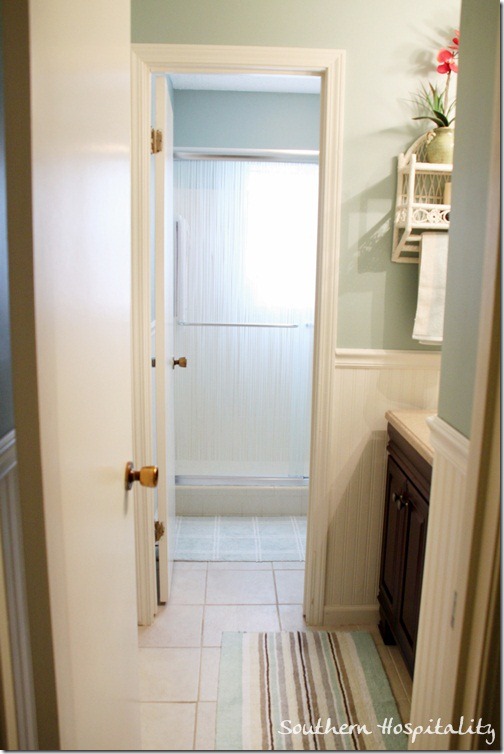
(Manual setting using tripod: 1/30s, f/4.5, ISO 800)
For my mom’s bathroom shots, I did use a tripod. So, I was able to move the shutter down to 1/30 speed and everything is pretty clear, letting in plenty of light as well.
These are a few tips from me that I hope will make sense to some of you who want to get better at photography. I am by no means an expert on any of this, as I said. I still feel like a complete novice most of the time. But, I’ve been told that my pics look nice and my goal is to get better and better with photography. I will be taking a class and hope to get more hands on help. I learn better by doing, not by reading a manual.
I’ve had my camera over a year and 1/2 now and I can see that my photographs have improved in that time, so I know I’m making progress. The more we practice, the better we all will get. It’s been fun to get excited about taking better photographs and in turn, this helps improve my blog.
The best tip I can give you with your blog is taking the best pics you can possibly take, whether you have a point and shoot camera or a fancy DSLR. Better pics make people want to come back and visit you time and time again. And make them as big as you can get them to fit your blog. I’ve had fun improving my photos for decorating and food and I really think it is one of the things that people like about my blog. I will take a ton of pics to get a few that are really good. I go through and delete the duplicates and only keep the best ones to post.
I wanted to share this post about photography first, but I’ll be back soon to share Part 4 of my blogging journey, since the next part took my camera up a notch with the big DSLR camera purchase that year.
We all love looking at beautiful photos, don’t we?
What is the #1 thing you’ve learned about photography? Are you passionate about taking better pics? Share in the comments, I’d love to hear from you too!


Thank you for a great read and all the information,i have had my Canon 8 months and i am still learning so much,i did learn to turn the flash off and to play with aperture but i still have a lot to learn so found this post really helpful x
Hi sweet friend
I’m up early…way too early…but I’m having fun sipping on some coffee and FINALLY catching up on my blog reading.
Lots of good tips. I keep telling myself I’m going to take a photography class. Maybe after our move???
Hugs,
Kat
Hi Rhonda! Thank you so much for those not to technical camera setting tips. Really, my mind “glazes over” when TMI is thrown at me at camera classes, reading professional photographer tips, etc. Your photos are just beautiful!
i agree about the flash- turn it off! HOWEVER, i bought a “light scoop” last year and now i can use a lower iso AND get much need light without that awful flash. for a $30 investment it was so worth it! i have a canon rebel t2i, and i LOVE my camera! great photo tips. :o)
Rhoda — You crack me up. So modest! You say you don’t know much and then go on to give us a gazillion tips. Thanks so much!
Ha! Barbara, I know, but compared to the pros, I don’t know much. This is just what I’ve managed to learn in over a year. Still so much more to learn!
Great information! I struggle with photography and read everything I can to improve my skill. Your explanations and tips are easy to understand and execute. I’m going to pin this post so I can refer back to it. Thanks for sharing!
Cheers,
Lori
Rhoda, I’ve been shooting photos for probably more than 10 years and I just now learned about the lighting meter. And I’m gonna be a little more brave with bumping up that ISO. I only ever went to about 500, so that could be why I’m having to bring levels up in Photoshop all the time. Thanks for the information. By the way, I was bummed you couldn’t make it to Blissdom. I was so hoping to meet you in real life. I will be at Haven, so maybe I can shake your hand then. You’ve inspired me so much with your story and your designs!
Rhoda, Thank you so much for a great post! I am taking baby steps to come off “auto” !! 🙂
Great post Rhoda! I have no idea what I am doing but I don’t cringe when someone says fstop now like I did 3 months ago when I got my first dslr. I am hoping to take Kevin’s photo workshop over at shootfly when they get going. I need help!!!! 🙂 Thanks for the tips. I love when someone shows a picture like you did, and puts all the settings in plain english (like you did). I have tried the putting the meter thingy in the middle but I have a feeling my camera is set on a certain setting b/c it seems when I dial around, the settings seem to be pretty wacky once they get to the middle. I just set the tripod up and shoot in daylight and PRAY it comes out not blurry 🙂 hehe
Great tips! Hope you have a great week!
Debbie
We’ve come a long way from our GI days. Novice years for me, photographing interiors!:-)
Blogging turned an interest in photography, to a full blown hobby I enjoy. I continue to learn something new every day.
Probably the easiest to understand piece I have read on photography how-to! Thank you! I’m printing this off and keeping it with my camera. I have a fancy,schmancy camera my hubby bought for me- and I am not doing it any justice…I know I need to take a class- but your tips are just the ticket to get me going in the right direction- even better! Thanks again, Rhoda!
Great post Rhoda. I think the best advise to anyone is to learn enough about the camera to use the manual mode. Practice, practice, practice! I love my Canon and I have loved learning how to take better pictures with it!
Hi Rhoda,
I don’t have a DSLR, but I hope to get one this summer. I’m still plugging away with my point and shoot. It takes some nice photos outside, but using it inside is a real challenge. But I love to read articles like you’ve written. It helps me understand the settings just a little bit more, so that when I get that camera that I want, I’ll know more about how to use it.
Great post! My biggest struggle is taking good photos. I have a crummy little camera and it takes me 100 tries to get a decent picture and I am never quite happy. I will just die of happiness when I can actually get a good camera!
Thanks for sharing this information and sharing these easy to follow tips. I really appreciate your blog.
Hi Rhoda!
Thanks SO MUCH for posting this! I am an interior designer (for many years) and now a novice blogger at nestfeathersbyjrl.com, and I have been working with a point and shoot camera forever and have been thinking I REALLY need to invest in something a little more versatile…but I hate the learning curve. I am so delighted to hear your ‘learn by doing’ approach is working in this arena – and it certainly is because your pics are lovely – because that is exactly how I would operate too! All the camera tips are just the kinds of things I needed to know. SO glad to have discovered your blog and looking forward to seeing more.
Blessings,
Janet
I just have a point and shoot but have greatly improved my pictures by not using the flash. I hope to upgrade to a DSLR someday. Until then I will just be thankful for what I have!
Hi Rhoda – your post has encouraged me to learn more about my camera. I have the same one as you and most commonly shoot in landscape mode because that is what I know best. I am ready to expand my horizons. Thanks for the boost!
I found your post very helpful, Rhoda! I just upgraded to a Canon Ti3 and I am learning as I go along. It really is difficult, but practice is the key. And I agree, nice pictures on your blog are so important! It is funny how one passion evolves into another!
XO,
Jane