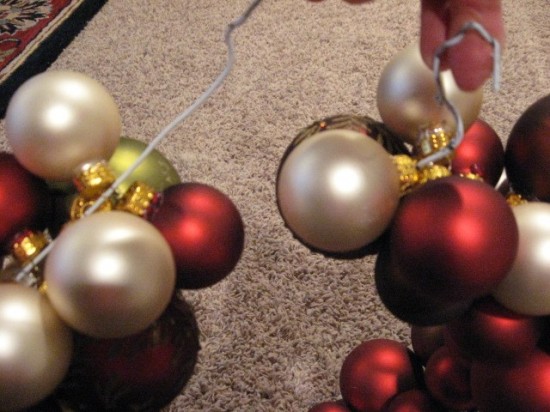
Right after Christmas last year, I picked up all these glass balls in the 1/2 off sales and decided to do a wreath just like Eddie Ross showed during the Christmas season last year. I showed it to you here briefly, but I didn’t take the time to show you how easy it was to put together and since it was after Christmas, it just went in my craft closet waiting on another Christmas to roll around. Go and look at Eddie’s version too, it’s really pretty.The best tip I can give you is to glue down the metal tips of the balls before you get started with your hot glue gun. This didn’t keep mine completely intact and I lost a couple of balls that just popped off and shattered on the floor from moving this fragile thing around, but gluing does help somewhat. And I’d tell you to get the shatterproof ornaments too, as they will be able to take the pressure of moving around a lot better than the glass ones. Just thread the ornaments on the wire hanger, alternating colors and sizes. They will move from front to back and you can play with them as you are threading to get them where you want them.
I’ll show you how it was put together. All you need is a wire hanger that you take apart and use as the guide for the circle. Then, it has to be clamped together with pliers or something similar to close it up and hold the hanger together.
Those wire hangers are tough to move with your fingers, so be forewarned about that. Then, you’ll want to cover up the top of the hanger with a pretty ribbon. You can try to bend the wire where it’s closed together, down so that it doesn’t show at all.
So, that’s it! Get a pretty ribbon, hang it up and enjoy. Mine is not perfectly uniform but it’s OK with me.
There are a few floating around this year. Sarah just did a pretty bronze version and Chris did one too in some cool colors. And Girly Stuff also has a larger and really colorful version. The great thing is, you can really personalize it to your decor and use whatever colors your little heart desires. One thing I would probably do different that Sarah did was use those shatterproof ornaments. Those would be much easier. Threading real glass ones like this puts some stress on them, so that’s why 2 or 3 of mine popped off and broke. Those shatterproof ones are really cheap too and still look good.
Get yourself some cheapie ornaments and make one too! I noticed that Walmart has some great looking shatterproof ornaments in all sorts of colors this year. And they have some really cute things in stock, much better than what I saw from them last year.
If you’ve made one of these, leave a comment, so we can all come and see yours too!
I’m joining Kimba’s DIY Day, along with Kate’s Ornament party, so go over and check them all out too.
I’ve got a really fantastic giveaway coming up later this week, so come back for that. And the Christmas Home tour is coming up Thursday, so I hope you have your pics and posts ready to link up!! It will be a super fun week!
**************************************

One of my very fine sponsors, Hudson Goods, is having a BIG Christmas sale with 40% off all Christmas items AND 20% off everything else in the shop, so if you’re looking for some great gift ideas or some very unique Christmas goodies for yourself, go on over and take a peek.
Sale ends Sunday, December 13th, so hurry! And at Hudson Goods, shipping is ALWAYS FREE on every item!
Click here:


I love reading your blog!! The ornament wreath is so gorgeous:)
oops! here’s my blog:
thriftysouthernlivingwithbrooke.blogspot.com
Very pretty. I love the colors you used and especially the hanging star.
Are you going to miss “As The World Turns”? Do you think soaps will be around for much longer?
Please stop by my blog and leave your comments.
Hi Rhoda!
Looks fantastic again!
Just posted a contest here: http://www.eddieross.com/eddie_ross/2009/12/ornament-wreath-challenge.html
Send Jaithan ([email protected]) a pic, and we’ll enter it!
Happy Holidays too!!
Eddie
Thank you for the instructions, SUPER important that you hot glue the ornament tops on, after that is is very easy. I love this blog!!
Love your colors (I’d be too paranoid to use real glass balls…that spells lots of clean up in our house!). I saw a huge wreath like this at CB2..loved it…but couldn’t imagine spending the$$ for it! I ended up using the $4 box of plastic balls at IKEA (took 2 boxes). My dad was around when I was fumbling with twisting the ends together. He took one look and said use the pliers to bend it back into a loop on one end, and then loop the other side into the first loop…kind of like hooking them together….GENIUS!!! (I’ll be posting on this later this afternoon with pictures if I’ve got ya totally lost!)
I used this idea with yours as an example on a blog post I just did about DIY wreaths. I looked at all the links you shared but I like your colors the best! So beautiful~~
http://mrspottsthoughts.blogspot.com/2009/12/diy-christmas-wreaths.html
I made a glass bulb ornament wreath and decided it would look great with a hurricane and candle in it. It’s gorgeous and not so likely to get broken. Will go with the shatterproof bulbs next year!
I always have a hard time hanging up my Christmas Wreath. Can’t put nails in my door so i tie a string to the wreath, pull it over the door and tie it to the inside door nob. Well i have to keep tying it throughout the holidays because it come loose with constant use of the door nob. I have been on a quest to find a solution. Recently i found a great product it’s a wreath hanger. I found it on ebay item number 200533748351 for anyone interested Merry Christmas all.