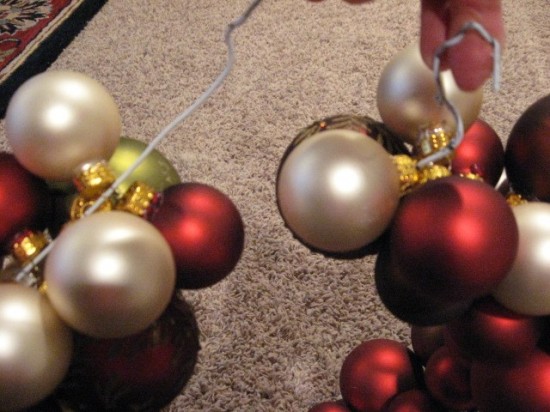
Right after Christmas last year, I picked up all these glass balls in the 1/2 off sales and decided to do a wreath just like Eddie Ross showed during the Christmas season last year. I showed it to you here briefly, but I didn’t take the time to show you how easy it was to put together and since it was after Christmas, it just went in my craft closet waiting on another Christmas to roll around. Go and look at Eddie’s version too, it’s really pretty.The best tip I can give you is to glue down the metal tips of the balls before you get started with your hot glue gun. This didn’t keep mine completely intact and I lost a couple of balls that just popped off and shattered on the floor from moving this fragile thing around, but gluing does help somewhat. And I’d tell you to get the shatterproof ornaments too, as they will be able to take the pressure of moving around a lot better than the glass ones. Just thread the ornaments on the wire hanger, alternating colors and sizes. They will move from front to back and you can play with them as you are threading to get them where you want them.
I’ll show you how it was put together. All you need is a wire hanger that you take apart and use as the guide for the circle. Then, it has to be clamped together with pliers or something similar to close it up and hold the hanger together.
Those wire hangers are tough to move with your fingers, so be forewarned about that. Then, you’ll want to cover up the top of the hanger with a pretty ribbon. You can try to bend the wire where it’s closed together, down so that it doesn’t show at all.
So, that’s it! Get a pretty ribbon, hang it up and enjoy. Mine is not perfectly uniform but it’s OK with me.
There are a few floating around this year. Sarah just did a pretty bronze version and Chris did one too in some cool colors. And Girly Stuff also has a larger and really colorful version. The great thing is, you can really personalize it to your decor and use whatever colors your little heart desires. One thing I would probably do different that Sarah did was use those shatterproof ornaments. Those would be much easier. Threading real glass ones like this puts some stress on them, so that’s why 2 or 3 of mine popped off and broke. Those shatterproof ones are really cheap too and still look good.
Get yourself some cheapie ornaments and make one too! I noticed that Walmart has some great looking shatterproof ornaments in all sorts of colors this year. And they have some really cute things in stock, much better than what I saw from them last year.
If you’ve made one of these, leave a comment, so we can all come and see yours too!
I’m joining Kimba’s DIY Day, along with Kate’s Ornament party, so go over and check them all out too.
I’ve got a really fantastic giveaway coming up later this week, so come back for that. And the Christmas Home tour is coming up Thursday, so I hope you have your pics and posts ready to link up!! It will be a super fun week!
**************************************

One of my very fine sponsors, Hudson Goods, is having a BIG Christmas sale with 40% off all Christmas items AND 20% off everything else in the shop, so if you’re looking for some great gift ideas or some very unique Christmas goodies for yourself, go on over and take a peek.
Sale ends Sunday, December 13th, so hurry! And at Hudson Goods, shipping is ALWAYS FREE on every item!
Click here:


Yes- note to self, use plastic ones next time and lots of hot glue. But a very fun, pretty project! Can’t wait to buy more bulbs after christmas on clearance! So fun to see everyones colors, yours are beautiful, so is your home! Merry Christmas!!
Love this idea….I’d forgotten about it …they are all over blogland huh ??? Next year that will be my new decoration, now I have to be on the hunt for some pretty ornaments….
Nice post,
Kathy 🙂
CUTE! THANKS FOR SHARING.
JANICE
Well …. I think I am going to try this! Wish me luck … and thank you for all of the extra special tips.
Beautiful wreath. thanks for directing to others for more examples.
Your wreath is so pretty!
Here’s mine:
http://ourniftynotebook.blogspot.com/2009/12/monthly-craft-challenge-cloche-party.html
Thanks so much for explaining how to make such a pretty wreath. I’ve been saving all my vintage ornies to make one and now I’m convinced that you are right and that shatterproof new ones are the better way to go! I’ve added your Christmas Home Tour button to my blog sidebar and also posted about it today ~ see you Thursday!
Big TX Hugs,
Stephanie
Angelic Accents
Hi Rhoda 🙂
I tried so hard to make one of these this past weekend, but I failed miserably LOL Maybe I’ll try it again after seeing yours 🙂
Your kitchen looks AMAZING all decorated for Christmas. I love the red and lime green together.
hugs,
rue
I have ALWAYS wanted to make one of these and you made it look so simple! Wow- I may have to give it a whirl!
I am doing a ‘lil give-a-way(actually my first EVER) at “The Kelton’s Cozy Cottage”-be sure to stop by and sign up.
http://www.thekeltonscozycottage.blogspot.com
I just made one last night! It was super easy and really inexpensive! (I went to the dollar store and got 12 ornaments for a dollar!) It’s not as pretty as it would be with glass ornaments, but it still turned out super cute!!! check it out:
http://jpmdesign.blogspot.com/2009/12/holiday-decorating.html
Eddie would be proud. 🙂
I saw a gigantic one this weekend that incorporated bits of tinsel and glued a second layer of the balls on so you could see some of the metal tips facing out. It was kind of cute. I was hoping to make one this year but time’s a ticking, and I’m a working — all the time! Bah humbug. 🙁
I made one of my own TODAY! I saw Eddie’s on Little Birdie Secrets last year and waited until clearance sales and bought my ornaments at the dollar store and W@lmart – maybe spent $10 total. Now I just need to tie a ribbon on it and hang it up. And blog about it, that will be soon, I hope!
This is lovely! I like the colors that you chose!
Thanks for the instructions, Rhoda, and especially the tips on what to do and what not to do. Yours is beautiful!
HI Rhoda, love your wreath. I have never made one of these but seeng yours makes me want to do one! Thanks for the inspiration! Your colors are beautiful together! BTW, I hope you have a Cracker Barrel near you….I was there today and they ahve some BEAUTIFUL lime green and red things! Really pretty and some are 25% off!!!! RUN!!!!:):) XO, Pinky
It looks great! I made one of these too using the plastic ornaments.
I made one last year using plastic ornaments. I will have to take photo and post it on my blog as well. Thanks!
I had seen this idea on another blog and decided to buy the ornaments and styrofoam wreath form which is what they used. When two of our granddaughters were here for Thanksgiving, i let them make it however they wanted to. They had fun being creative with where they placed which ornaments. Here is the post which shows their wreath. http://lz7780.blogspot.com/2009/11/christmas-wreath.html
By the way, yours is gorgeous!! Wish I’d bought ornaments at a half price sale last year!!
I love your wreath!! I have seen so many pretty balls this year that people are decorating with. Thanks for sharing. Love & blessings from NC!
Your wreath is very pretty. You were smart to buy your balls on sale last year after Christmas.
I made a monogram wreath out of balls for my front door. I think you’ll like it! You can see it here:
http://virginiasweetpea.blogspot.com/2009/11/ornament-wreath-monogram-style.html